A DNS leak test shows who answers your website lookups
A DNS leak test lists the servers that turn names like example.com into addresses like 203.0.113.10 for your device. Every site you open starts with one of these lookups, so whoever runs the answering server sees a timestamped list of every domain you visit.
With a VPN connected, those lookups should travel inside the tunnel and reach the VPN's resolver. A DNS leak means a lookup slipped out and reached your home internet provider's resolver instead, with your real address attached.
The test itself is simple. The page makes your browser look up a few unique names, watches which resolvers ask for them, and reports those resolvers' addresses, owners and countries.
How to run a DNS leak test in five steps
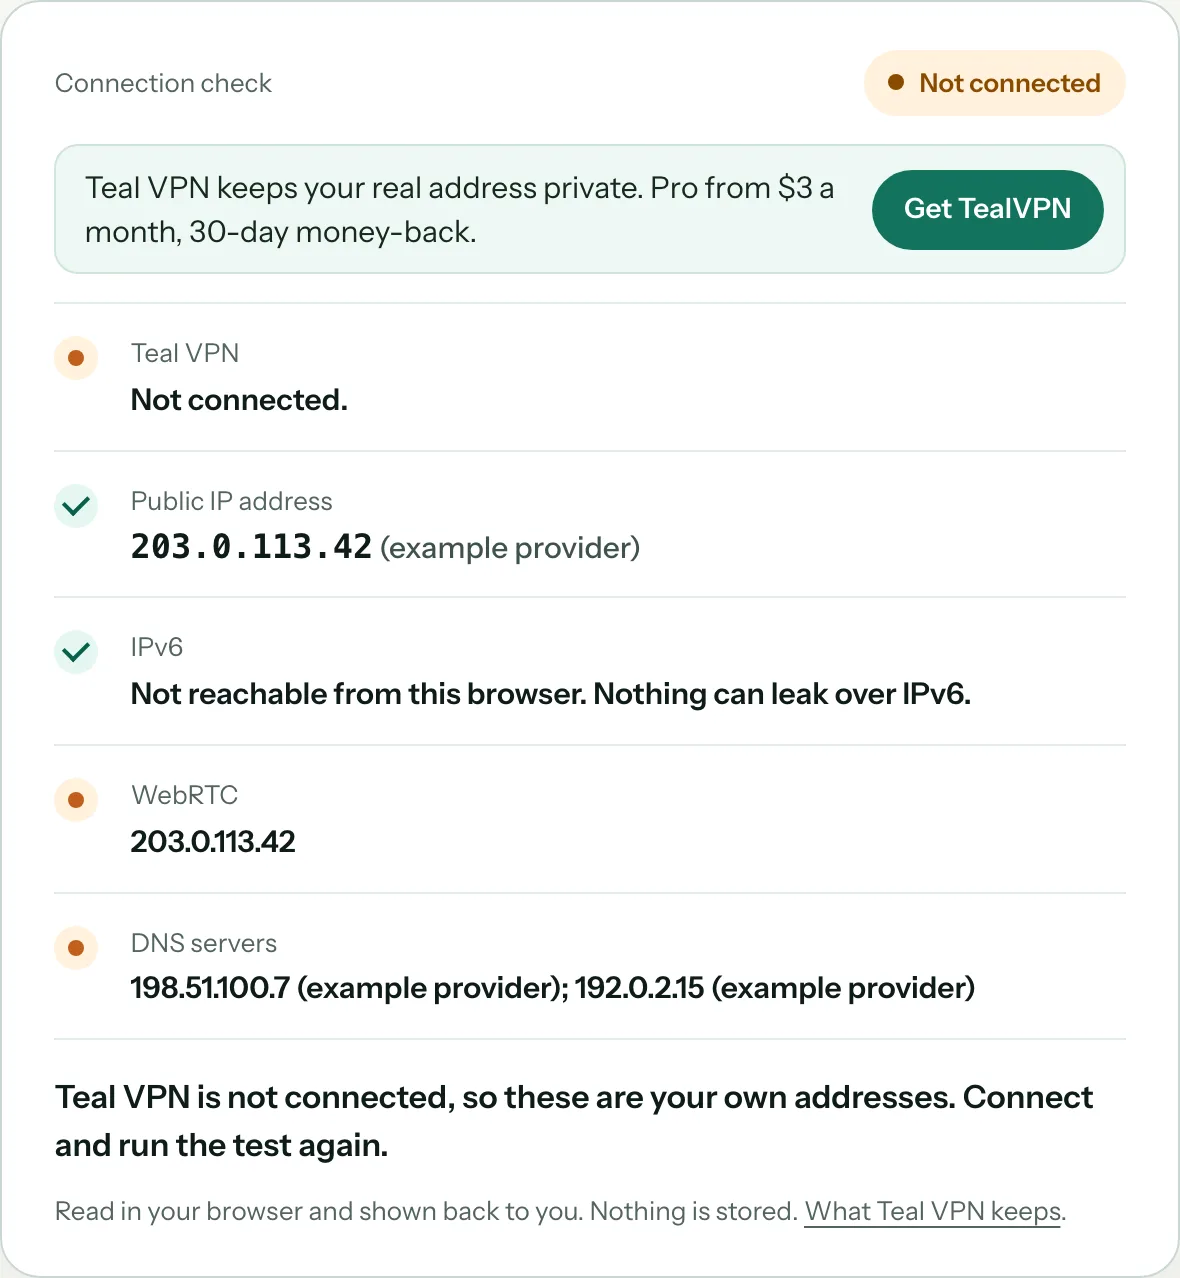
Open https://tealvpn.com/ip-leak-test with your VPN connected. It shows your public IP and the DNS servers answering your lookups, needs no sign-in, and works with any VPN, not only Teal.
Leaks are usually a device setting rather than a VPN setting, so a pass on the laptop says nothing about the phone. Repeat the five steps on every device and every network you use, including mobile data and hotel Wi-Fi.
Record the baseline with the VPN off
Disconnect the VPN and open https://tealvpn.com/ip-leak-test. Write down the IP and the DNS owner it shows. That owner, normally your home internet provider, is what a leak looks like later.
Connect the VPN and reload
Connect to a server in another country, wait for the app to say connected, then hard-reload the page (Ctrl+Shift+R on Windows, Cmd+Shift+R on Mac) so the browser cannot reuse cached answers.
Compare the DNS owner column
The owner should now be the VPN company or a resolver in the country you picked. If the provider name from step 1 is still listed, lookups are leaving the tunnel.
Get a second opinion
Repeat on dnsleaktest.com (choose Extended test) and browserleaks.com/dns. Two independent pages agreeing rules out a glitch on any single page.
Test again after every change
Each fix in the section below changes what the device does with lookups. Reload https://tealvpn.com/ip-leak-test after each one until the provider name is gone.
How to read a DNS leak test result
The test passes when every DNS server listed belongs to your VPN or sits in the country you connected to, and your home provider's name appears nowhere.
The confusing case is the fourth row. People set 1.1.1.1 or 9.9.9.9 on a router, run a test, and see addresses they never typed. Those are the resolver's outgoing addresses; the owner column still reads Cloudflare or Quad9, and that is not a leak.
| What the result shows | What it means | What to do |
|---|---|---|
| A server owned by your home internet provider, VPN on | Leak. At least one lookup left the tunnel. | Work through the fixes below, then retest. |
| Servers owned by the VPN company, in the server's country | Pass. | Retest on each other device and network. |
| Cloudflare, Google or Quad9 with the VPN on | Your device or browser has its own DNS set and skips the VPN's resolver. Your provider sees nothing, but the VPN is not handling lookups. | Set DNS to Automatic if you want the VPN to handle it, then retest. |
| An address that differs from the 1.1.1.1 or 9.9.9.9 you typed | Normal. The test sees the address the resolver uses to reach the internet, not the address you entered. | Judge by the owner column, not the exact number. |
| Many servers across several countries | Common with large resolvers that spread lookups between sites. Not a leak by itself. | Look for your provider's name; if absent, it passes. |
| An IPv6 address with the VPN on | Possible IPv6 leak if the VPN tunnels only IPv4. | Turn off IPv6 on the adapter or use a VPN that handles IPv6. |
Why the VPN says connected but DNS still leaks
DNS leaks almost always come from the device choosing a resolver the VPN never touched, not from the tunnel itself breaking. The router is the most common culprit: many home routers hand devices a local address (the router itself) as the DNS server. The operating system ranks that local address above the VPN's resolver, local traffic is not tunnelled, so lookups go to the router and on to your provider.
Windows adds two of its own. Teredo, a built-in feature for IPv4 and IPv6 compatibility, can route lookups around the tunnel. Windows can also send a lookup out of every network adapter at once and accept whichever answer arrives first, including the one from your provider.
The rest are settings you chose earlier and forgot: a DNS server typed into the adapter, a browser with its own 'secure DNS' switched on, or a VPN set up by hand from a config file instead of the official app. Each one answers lookups before the VPN gets a say.
How to fix a DNS leak
Fix in this order: use the VPN's own app, clear custom DNS, turn off the Windows features that route around the tunnel, and retest after each step. Most leaks disappear at step 1 or 2.
Use the official app, not a manual profile
Hand-built profiles set up the tunnel but often leave DNS alone. The official app rewrites the device's DNS when it connects and puts it back when it disconnects.
Set the adapter's DNS back to Automatic
Windows: Settings > Network & internet > your adapter > DNS server assignment > Automatic. Mac: System Settings > Network > your connection > Details > DNS, remove any typed entries.
Turn off the browser's own DNS
Chrome and Edge: Settings > Privacy and security > Security > turn off 'Use secure DNS'. Firefox: Settings > Privacy & Security > DNS over HTTPS > Off. The browser then uses whatever the VPN app set.
Disable Teredo on Windows
Open Command Prompt as administrator and run: netsh interface teredo set state disabled. Reconnect the VPN and reload https://tealvpn.com/ip-leak-test.
Turn off IPv6 if your VPN tunnels only IPv4
Windows: adapter Properties > untick Internet Protocol Version 6. Mac: Network > Details > TCP/IP > Configure IPv6 > Link-local only. Retest and look for any remaining IPv6 address.
Switch on the kill switch
A kill switch stops all traffic, lookups included, if the tunnel drops for a moment. Without it, every reconnect is a short window where your provider answers lookups.
DNS, IP, WebRTC and IPv6 leaks are four different tests
A DNS leak test checks only resolvers. Your real address can also show through the browser's WebRTC feature or through an IPv6 connection the VPN ignores, so a complete check covers all four.
Run them in one sitting with the VPN connected. The DNS and plain IP checks sit on the same Teal page; WebRTC needs a page that asks the browser directly.
| Leak type | What gets exposed | Where to check | Fix |
|---|---|---|---|
| DNS | Every domain you look up, sent to your provider's resolver | https://tealvpn.com/ip-leak-test, then dnsleaktest.com | Steps in the section above |
| Public IP | Your real address when the tunnel is down or never came up | https://tealvpn.com/what-is-my-ip | Kill switch; confirm 'connected' before browsing |
| WebRTC | Local and public IP handed out by the browser's calling feature | dnsleaktest.com/webrtc.html | Firefox: set media.peerconnection.enabled to false; Chrome: a WebRTC-limiting extension |
| IPv6 | Your IPv6 address alongside the VPN's IPv4 one | Any of the pages above that lists an IPv6 address | Turn off IPv6 on the adapter or use a VPN that tunnels IPv6 |
What a DNS leak test shows with Teal VPN
As of October 2026, Teal VPN publishes the test it wants you to run against it: https://tealvpn.com/ip-leak-test shows the public IP and the DNS servers answering your lookups the moment you connect, with no sign-in. Teal Free gives 500 MB a day on 2 devices with nothing but an email, which is more than enough to run every check on this page before paying anything.
Teal Secure obfuscation is on for every connection and every plan, and the app tries other routes by itself when a network closes one. On strict networks that matters for the test: a VPN that silently drops to a plain connection would leak everything, so the result page is how you confirm the tunnel actually came up before you browse.
Paid plans cost $7.99 a month, $24 for six months or $36 a year ($3 a month), with a 30-day money-back window, 14 server countries (Australia, Canada, France, Germany, Japan, Lithuania, Netherlands, Poland, Singapore, South Korea, Sweden, Switzerland, United Kingdom, United States), and up to 10 devices on the yearly plan or 5 on monthly and six-month. Apps cover Android, Android TV, Windows, Mac, Linux and Chromebook, plus Chrome, Edge and Firefox extensions. If the test lists your provider's resolver with the Teal app connected, work through the fixes above; if it still leaks, that is a bug worth reporting, and the money-back window covers the time to find out.
Keep reading
References
- DNS leak test (dnsleaktest.com)
- DNS Leak Test (BrowserLeaks)
- DNS leak: how it happens and how to protect yourself (IONOS Digital Guide)
- dnscheck.tools: check your DNS resolvers
Need help with Teal? Contact support.
Questions
What is a DNS leak test?
A page that makes your browser look up a few unique names, records which DNS servers asked for them, and shows you those servers' owners and countries. If your home internet provider appears while a VPN is on, DNS is leaking.
Does a DNS leak test need an account or an app?
No. Teal VPN's test at https://tealvpn.com/ip-leak-test runs in any browser with no sign-in, and dnsleaktest.com and browserleaks.com/dns work the same way.
Is it a leak if the test shows Cloudflare or Google with the VPN on?
Not a leak to your provider, but it means your device or browser has its own DNS set and the VPN is not handling lookups. Set DNS to Automatic if you want the VPN's resolver to answer.
Why does the test show a different address from the 1.1.1.1 I set?
The test sees the address the resolver uses to send its own queries out, not the address you typed. Check the owner name instead; if it says Cloudflare, your setting is working.
My VPN passes on the laptop. Do I need to test the phone too?
Yes. Most leaks are device settings such as a typed DNS server, browser secure DNS or IPv6, so each device and each network needs its own run.
Does a browser extension stop DNS leaks?
Only inside that browser. Other apps on the device keep using the normal resolver, so use the desktop or mobile app when you want a whole-device result.
How often should I run a DNS leak test?
After every VPN app update, every operating system update, and the first time you connect from a new network. Those are the moments settings change without you noticing.